

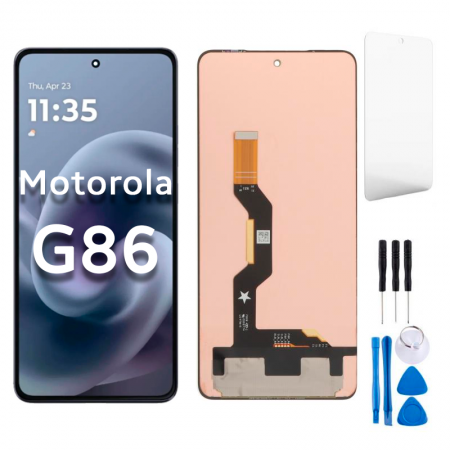
Motorola G86 Power Screen Replacement
Availability:In Stock!
Motorola G86 Power Screen Replacement Features and Price in Kenya.
-
LCD with Touch Combo (Folder/Assembly):
-
Description: This is the complete screen module, including the display panel, touch screen digitizer, and front glass, pre-assembled.
-
Feature: It is the easiest and safest option for replacement, as it involves removing the old assembly and installing the new one, minimizing the risk of damage during component separation.
-
Recommended for: Most users and general repair shops.
-
-
Individual Components (More Technical):
-
Front Glass Only: Replaces only the top glass layer if the display and touch functionality are perfect. This is a very technical and risky procedure requiring specialized machinery.
-
Touch Screen Digitizer: Replaces the layer responsible for touch input if the display (image) is fine. Also requires specialized skills and equipment to separate from the display.
-
LCD/Display Only: Replaces only the image-producing part if the top glass and digitizer are functional. Also requires separation tools and expertise.
-
KSh 5,500.00
CompareMotorola G86 Power Screen Replacement Specifications.
The Motorola G86 Power is equipped with a dazzling display that boasts a screen size of 6.5 inches, making it suitable for various tasks such as streaming, gaming, and web browsing. This device features a high resolution of 2400 x 1080 pixels, ensuring that images are crisp and vibrant, which enhances the overall user experience. The screen technology utilized in the Motorola G86 Power is IPS LCD, known for providing consistent color reproduction and wide viewing angles. As a result, users benefit from an immersive multimedia experience without compromising visual quality.
Despite its impressive specifications, the display is not immune to issues that may lead to the necessity of a screen replacement. Common problems include physical damage resulting from accidental drops or impacts, which can cause cracks or shattered glass. These damages not only affect the aesthetic quality but can also hinder touchscreen responsiveness, making it difficult to navigate the device effectively. Furthermore, users may experience software glitches that disrupt the screen functionality; these can manifest as unresponsive areas on the display or erratic touch inputs. Such software-related dilemmas can often be resolved through updates or resets, yet persistent issues may require a more comprehensive solution.
Battery problems are another factor that can indirectly affect the screen performance. A failing battery can lead to unexpected shutdowns or diminished brightness, which may compromise the usability of the device. When the battery struggles to supply adequate power to the screen, it may lead to flickering or dimming of the display, prompting users to consider a battery replacement alongside the screen repair. Understanding these aspects can help users make informed decisions regarding the necessity and timing of a Motorola G86 Power screen replacement.
Signs You Need a Screen Replacement
Identifying the need for a screen replacement on your Motorola G86 is crucial to maintaining its functionality. Several warning signs can indicate that your device’s screen requires immediate attention. One of the most apparent signs is an unresponsive touch functionality. If you find that certain areas of the screen do not register your taps or gestures, it may point to hardware malfunction.
Another common indication for a screen replacement is the presence of visible cracks or scratches on the display. Even minor imperfections can escalate into larger issues if not addressed promptly. Cracks can compromise the internal components of the phone, leading to further damage if left unchecked. Thus, vigilant inspection for physical damage is key.
Additionally, discoloration or distortion of images can signify that your Motorola G86 screen is failing. For instance, if colors appear faded or if specific sections of the display show discoloration, it can impact your overall experience. Such visual irregularities might suggest that the screen’s LCD is damaged or malfunctioning, prompting the need for repair.
Brightness issues may also be an indication that the screen requires replacement. If the display appears too dim or overly bright, even after adjustments in settings, this could point to a deeper technical issue that needs addressing. In such cases, you might also want to consider the possibility of software-related problems, which can sometimes mimic hardware failures.
Diagnosing these symptoms properly is essential before proceeding with a replacement. Ensure the problem is indeed hardware-related and not a software glitch, as troubleshooting software issues can sometimes resolve similar symptoms. By being aware of these signs, you can make informed decisions regarding the necessity of a screen repair for your Motorola G86.
DIY vs. Professional Screen Replacement: Which to Choose?
When faced with the need for a Motorola G86 power screen replacement, individuals often grapple with the decision of whether to undertake the task themselves or seek professional assistance. Both options carry distinct advantages and disadvantages that warrant careful consideration.
One of the most appealing aspects of a DIY screen replacement is cost-effectiveness. Typically, replacing a screen at home can prove significantly cheaper than employing professional services. However, this route requires specific tools, such as screwdrivers, adhesive, and a heat gun, as well as replacement parts, which can also add to costs. Additionally, a certain level of technical skill is necessary, as the process can be intricate, especially if one lacks previous experience with smartphone repairs. Without the proper knowledge, there is a risk of inflicting further damage to the device, which could lead to a more expensive fix.
Another important factor to consider is the warranty. Most manufacturers include specific clauses that state DIY repairs may void any existing warranty. Thus, if issues arise after a DIY replacement, the user could find themselves with a device that lacks manufacturer support.
On the other hand, opting for professional screen replacement offers a plethora of benefits, including access to experienced technicians who can handle repairs promptly and efficiently. Professionals typically provide guarantees on their work, ensuring that if problems arise post-repair, they will be rectified at no additional cost. Furthermore, they utilize high-quality parts that often surpass the standards of aftermarket components commonly used in DIY jobs.
In choosing between DIY and professional screen replacement for the Motorola G86, individuals should weigh their budget, technical ability, and the level of risk they are willing to assume. Each option presents unique considerations that can significantly impact the outcome of the repair process.
Step-by-Step Guide to Replacing Your Motorola G86 Power Screen
Replacing the power screen of your Motorola G86 can be a rewarding endeavor. To successfully complete this task, you will need a few essential tools: a small Phillips screwdriver, a suction cup, a plastic opening tool, and a replacement screen. It’s also advisable to have a clean, well-lit workspace and a safety mat to prevent any damage while working on your device.
Before beginning, ensure that your device is powered off and that you have removed the SIM card tray. Start by using the suction cup to gently lift the screen from the device’s body. Insert the plastic opening tool into the gap between the screen and the body to carefully separate the adhesive. It is critical to apply minimal force to avoid damaging internal components. Once you have loosened the screen edges, slowly detach it from the main body, being cautious of any cables attached.
Next, identify and detach the connectors that link the power screen to the motherboard. This step may require the use of your Phillips screwdriver. Make sure to keep track of screws and components, as they will be essential for reassembly. After disconnecting the old screen, you can now align the new power screen into place, ensuring that all connectors fit securely.
Prior to securing the new power screen, double-check that there are no dust particles on the adhesive surface. After confirming cleanliness, press the new screen into place firmly. Reattach the screws and connectors that were removed during disassembly. Follow this up by ensuring the device powers on correctly and the screen functions seamlessly.
If you encounter any issues during this process, such as a non-responsive screen or display pixelation, it may indicate improper connection or a defective replacement screen. In case problems persist, consulting a professional is recommended to prevent further damage. Should you choose to replace the screen yourself, sourcing a quality replacement through reputable suppliers can significantly enhance the success of your repair.


There are no reviews yet.